Ozi Explorer and Dutch Topographic Maps
Preface
The following text is only a technical manual of sorts. No background information is given. If you are interested in related subjects, want to know the meaning of terms, what is it with the map-datum, how to navigate, the use of different projections etc. I can advise a visit to the (Dutch language) webpages of Rob Ziere with a lot of of clear information. Click on the menu 'GPS Info' and make a choice of 'Tips en Trucs' or - if you have extended interests - to 'Hoe GPS werkt'. In the English language I can advise the text of Peter H. Dana title Geodetic Datum Overview . If you are able to read German there is nice amount of information that was published in Explorer Magazine and is written by Sixta Zerlauth . There is also a lot of information about the other European mapdatums and how to set your GPS for them.
When you want to know more about using self-scanned maps in Ozi Explorer then there is also a nice Dutch manual here: deBruineBeren Software.
Introduction
All tips and tricks I mention here are only applicable for the full version of Ozi Explorer (not the demo-version). Further more you will need to have one or more digitized topographic maps. If you cannot find then, make them yourself.
For a start: see if there is in the same directory as Ozi a file with the name datums.dat containing at least the following line:
RD, 3, 593, 26, 478
Without this file all your points will be wrongly placed on the maps.
Addentum: Ozi Explorer also knows - in newer versions - about our Dutch grid. That is then called 'Rijksdriehoeksmeting' and this file 'datums.dat' is not needed any more. But you better play it safe and place this file in the directory.
With every digitally scanned map comes a so called map-file. It is an editable textfile containing all kind of definitions: what kind of coordinate system is used, what kind of projection to make a flat plane from a piece of the surface of the round earth, calibration information, where the pixel-picture can be found and what kind of format (jpg, png, gif, bmp) is used etc.
The contents of the mapfile for Scheveningen is here.
When you want to view a map do a 'load map-file', do not import a picture-file; Ozi is not a drawing-program.
Picture format
When you use Ozi you will see that you have to wait when maps are loaded into memory to be displayed. You can do a lot to minimize this waiting-time. What is the best for you depends on the speed of the harddisk and the speed of the CPU.
In my case (400 MHz Celeron, normal harddisk IDE) loading a Jpeg file (jpg) takes about 25 seconds, most of this time is used by the CPU to unpack the JPEG file: that seems to take a lot of computingpower!
I converted (batch processing with Paint Shop Pro) my files from JPG to GIF. This format has 256 colors but I get big files (not much compression). The gif-picture takes a longer time to load but the CPU has much less work to do: in the end it is faster.
Next I have converted the GIF-files (again with Paint Shop Pro) to PNG format (with 256 colours). Now they are smaller then GIF but bigger then JPEG. And the CPU has not so much to do (at least what has to be done goes fast). So for me: png is the optimal solution.
I have another reason not to use JPEG in Ozi: the display of faint colors goes patchy. So faint yellow and faint blue fields become white with only incidentally a blotch of the right colour. Using PNG gives good viewing results. And a last reason is: when zooming to 25 percent the jpeg picture looks very bad: PNG and ozf2 (see later) display very wel with this low zoom-ratio.
On the Ozi site under 'utilities' there is a program to convert normal colour graphics (jpg, png, bmp...) to a special Ozi-format (ozf2). To use that format has its pros and cons. First: the pictures are tiled so only those parts are taken from disk into memory that are needed for displaying on the screen. The drawback is: when you want to use views of the maps smaller than 100 percent you have to have made them beforehand. And then the filesize grows a lot if you are not carefull! Read all about it in the Ozi Help. The display quality of the pictures is about the same as for the png-format and much better then the display of pictures in the jpg-format.
After some more experiments I found out that converting the PNG-format files to OZF2 works fine. When making a ozf2-file with only the 25 en 50 percent (and of course the 100 percent) pictures in it, it loads very fast. Even better than the png-files!
Configurating
In the menu 'File' there is the entry 'Configuration'. Here a number of important things have to be set. First in the box there is:
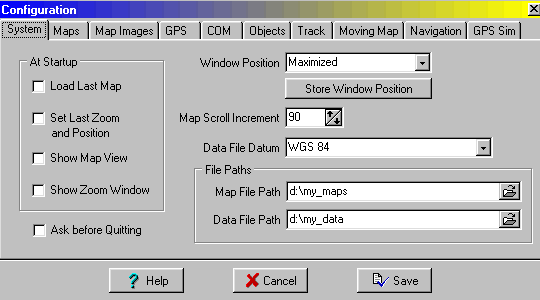
Keep 'Data file datum' on WGS84. Realize that all counting is done in the world-system but that only the representation on screen is in RD-coordinates. Also the GPS prefers everything that goes in and out to be in WGS84 (at least my GPS12). The next tab gives:
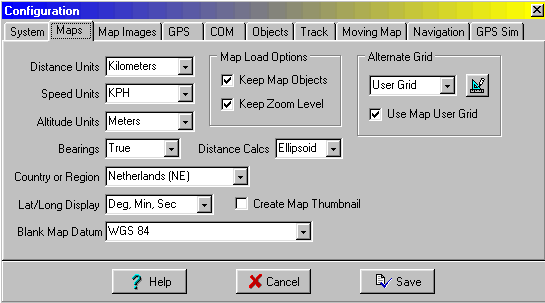
We go into the metric system and leave that WGS84 for the Blank map standing there. Later on you will see a way to use this Blank Map for your advantage.
But pay attention: we switch on the User Grid!
When you click on the 'alternate Grid' symbol (to the right of the text 'User Grid') you will see the following numbers in a box:
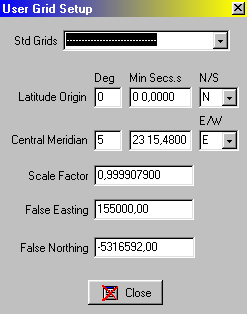
(At least as long as you have a RD-map loaded).
The next thing to do is:
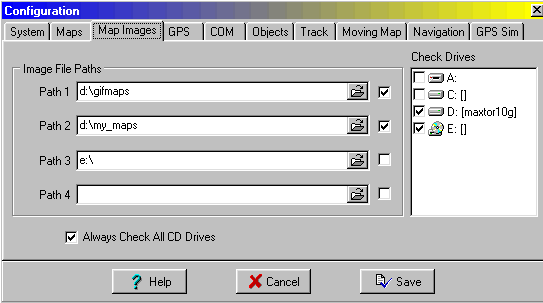
It is in your best interest that the computer can find the files needed. Put the right paths in here for your computer.
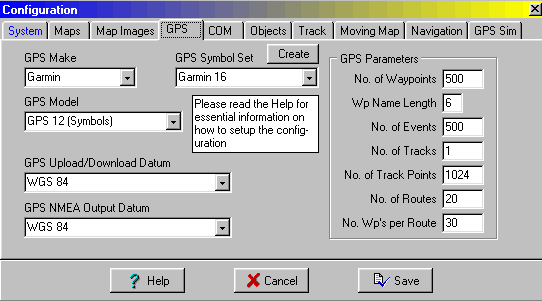
Maybe it you have different numbers here. What I show here is automatically set because I have chosen the GPS12 as my type.
The Grid
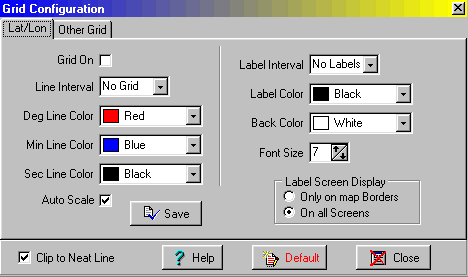
After some experimenting I decided that I like a grid on my screen. Go to the menu 'Map' and item 'Grid Line Setup'. A box pops up. First I set the normal grid off (the tab is labeled Lat/Lon):
and put the alternative grid in use (label: Other Grid)
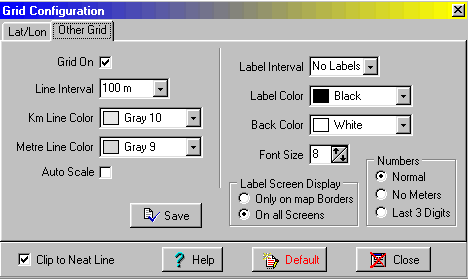
My maps come already with a printed grid on it for the kilometers. It is nice to have a grid with 100 meters distances.
When you have followed my advice the grid will show, sometimes you have to do a 'save' first and a reload of the new mapfile for the settings to come into effect. Here is a piece of the left upper corner of the screen:
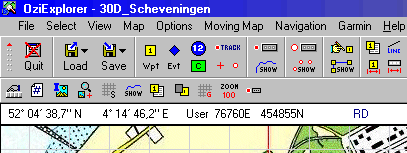
Do you see the 'RD' (could also be 'Rijksdriehoeksmeting')standing there and the position in 'User' Northing and Easting? But beware: there is here a misleading notation: those degrees on the left are only a non-relevant translation of the RD-coordinates. They are not I repeat NOT positions in the WGS84 notation. If you do not believe me: put those degrees in your GPS by hand, switch your GPS to 'RD User Grid' notation and you will see: that gives different RD-coordinates there. Really hundreds of meters wrong!
The waypoints
When you import a list of waypoints (with the 'Load' menu option 'Append waypoints from file') you can view them like this:
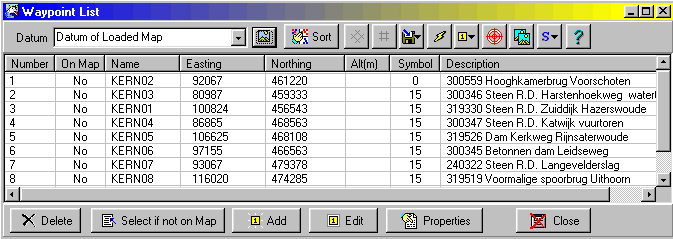
See 'Datum of loaded Map' (that is RD!). Also the button 'Use user grid grid' (yes, really) is on. Positions are in Northing and Easting. When we add or edit a point and press the button for it we see: user Grid is in use and Northing and Easting and Position Datum RD. As should be.
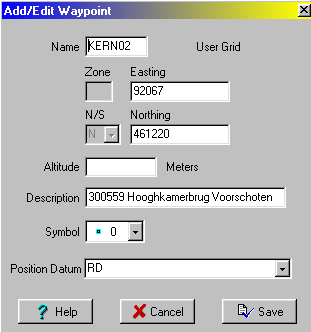
Remember what I said before: all I/O with the GPS and with files uses the WGS datum and degrees-notation. It is only when viewing Dutch maps with RD coordinates and adding/editing points on the map that you see and use RD-coordinates. And why not? Using numbers representing meters and kilometers is more intuitive for me than degrees, minutes and decimal seconds.
Inputting Waypoints, Tracks etc.
But sometimes you get points on paper in WGS84 and degrees-notation. How to type these? An easy work-around is: load from the menu 'Map' the the 'Blank map (Auto Scale)' that you had given the 'WGS84' as default in the 'Configurations'. Now you can type your positions in degrees in WGS84 (save them in a file if you want).
Here I have loaded some caches on the Blank Map.
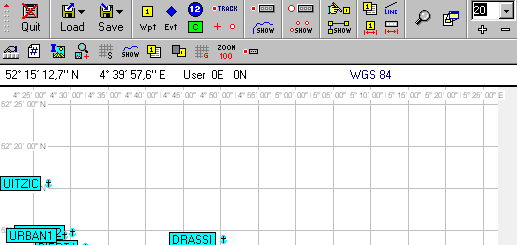
Move the mouse on the map and you will see that the numbers for the degrees change but the numbers 0E and 0N stay the same. Now simply open the waypoint list. It depends on what you have done before how the representation is: degrees or RD. Before I loaded this Blank WGS84-map I had a Dutch RD-map in use.Look here how the waypoint list looks: pure rubbish!!!
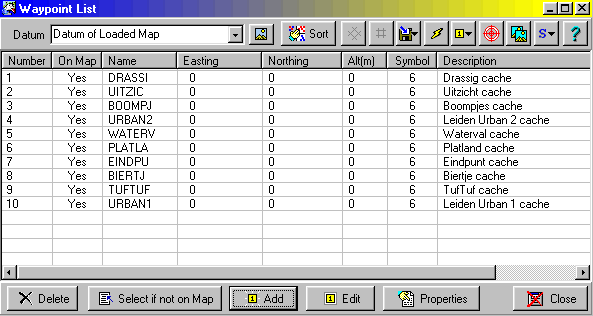
It even can get worse: try to add a new waypoint en you see this impossible combination:
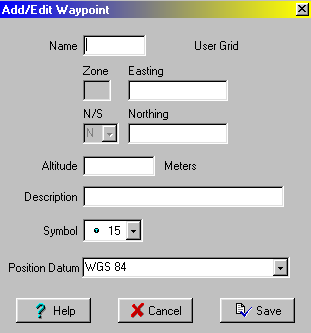
There is a user grid (not true: the map has a WGS84 degrees grid) and you have to give Easting and Northing (as if there is RD-grid!) but the position datum is WGS84. This is what brings confusion in the brains of users.
So you have to use your own intelligence: take the mouse in your own hand and click the waypoint list button that corresponds to the system in use at the moment.

The left one for degrees and WGS84 the other one for Dutch RD-topo maps.
In a way the same warning about mixed representations is true for:
When you put the mousepointer on a waypoint on the map a pop-up with name and position is shown. Use only the RD-coordinates, not the 'degrees' when the map is a RD-map.
Buttons
You can make your own row of buttons for things you use often (Customize Toolbar, Assign Function Keys). I have placed the following buttons:

Customize Toolbar, Waypoint list, Show/Hide Track, Show/Hide Waypoints, Show/Hide other Grid, Zoom 100 and Show/Hide Track Control.
Especially the 'Show Other Grid' button you should place. When a map is zoomed out to say 1/5 then the lines of the grid mask the underlying map very much. One click on the button and you have a clear view!
How to put those buttons there? Use the 'Customize Toolbar' item in menu 'File'.
OziCE and the maps in RD
Using OziCE on a small handheld gives you a problem: maps using datum 'RD' need a file datums.dat and OziCE does not look at this file. This results in all things being wrongly placed! The solution is: use the map-datum 'Rijksdriehoeksmeting' that is also known to OziCE. (No need for a special file of type .dat) Change in all your map-files the mention of 'RD' to 'Rijksdriehoeksmeting' by doing a find-and-replace in all files in a given directory using the free program TexRep.
More about using WGS84
Many times I was asked if it is possible to do away with RD (or Rijksdriehoeksmeting) and use only coordinates in the WGS84 system. That is possible but explaining it is a long story that you can read here.
Prof. Y. Lupardi


